
“Florentine Plaster”

The incredible Florentine plaster is an easy, yet gorgeous faux finish technique. Still, after about twenty years, one of the best sellers. FP looks like a multi layer technique, but is not. Production is fast, easy and can not be compared to other textured techniques, due to inexpensive application. Contemporary, modern or electic, take your pick, Florentine Plaster will always be the "talk of the party"

“Croco”

An exquisite crocodile leather look alike faux finish. Designed and created for a famous baseball player. The king size bed, custom made to highlight this faux wall finish. Mediums used: Water Putty, Olive oil, gift-wrap etc.

“Grandeur”

(`granjər,`granˌdyo͝or/) noun: splendor and impressiveness, especially of appearance or style. The dictionary says it all. This grandiose faux finish was created with MM metallic plaster, gold powder and assorted MM metallics.

“There's No Crying in Baseball”

An extremely fast and effective wall glazing finish resembling a baseball. Created with paint only.

“Tuscany”

I found this beautiful faux finish in Florence, Italy in the Orsini Palace.

Welcome to My Home

Hello and Welcome!! My name is Heidi and one of my passion is faux painting. However, there are otherpasions and I live them daily. Take your pick. Interior design, decorating on the shabby side, gardening, herbs, fashion, culture and and last but not least "Style". In my world, the day should have 48 hours and more.

I am here to share some of my adventures with you, because I love to share and teach. I hope that you come by often and stay a while. Thank you for sharing your time with me.
Showing posts with label Illusionsmalerei. Show all posts

Thursday, March 6, 2014

A Paper Floor - Inexpensive and it lasts and lasts!!!

Hello from St. Louis,
Yes, a paper floor lasts and lasts!!!!
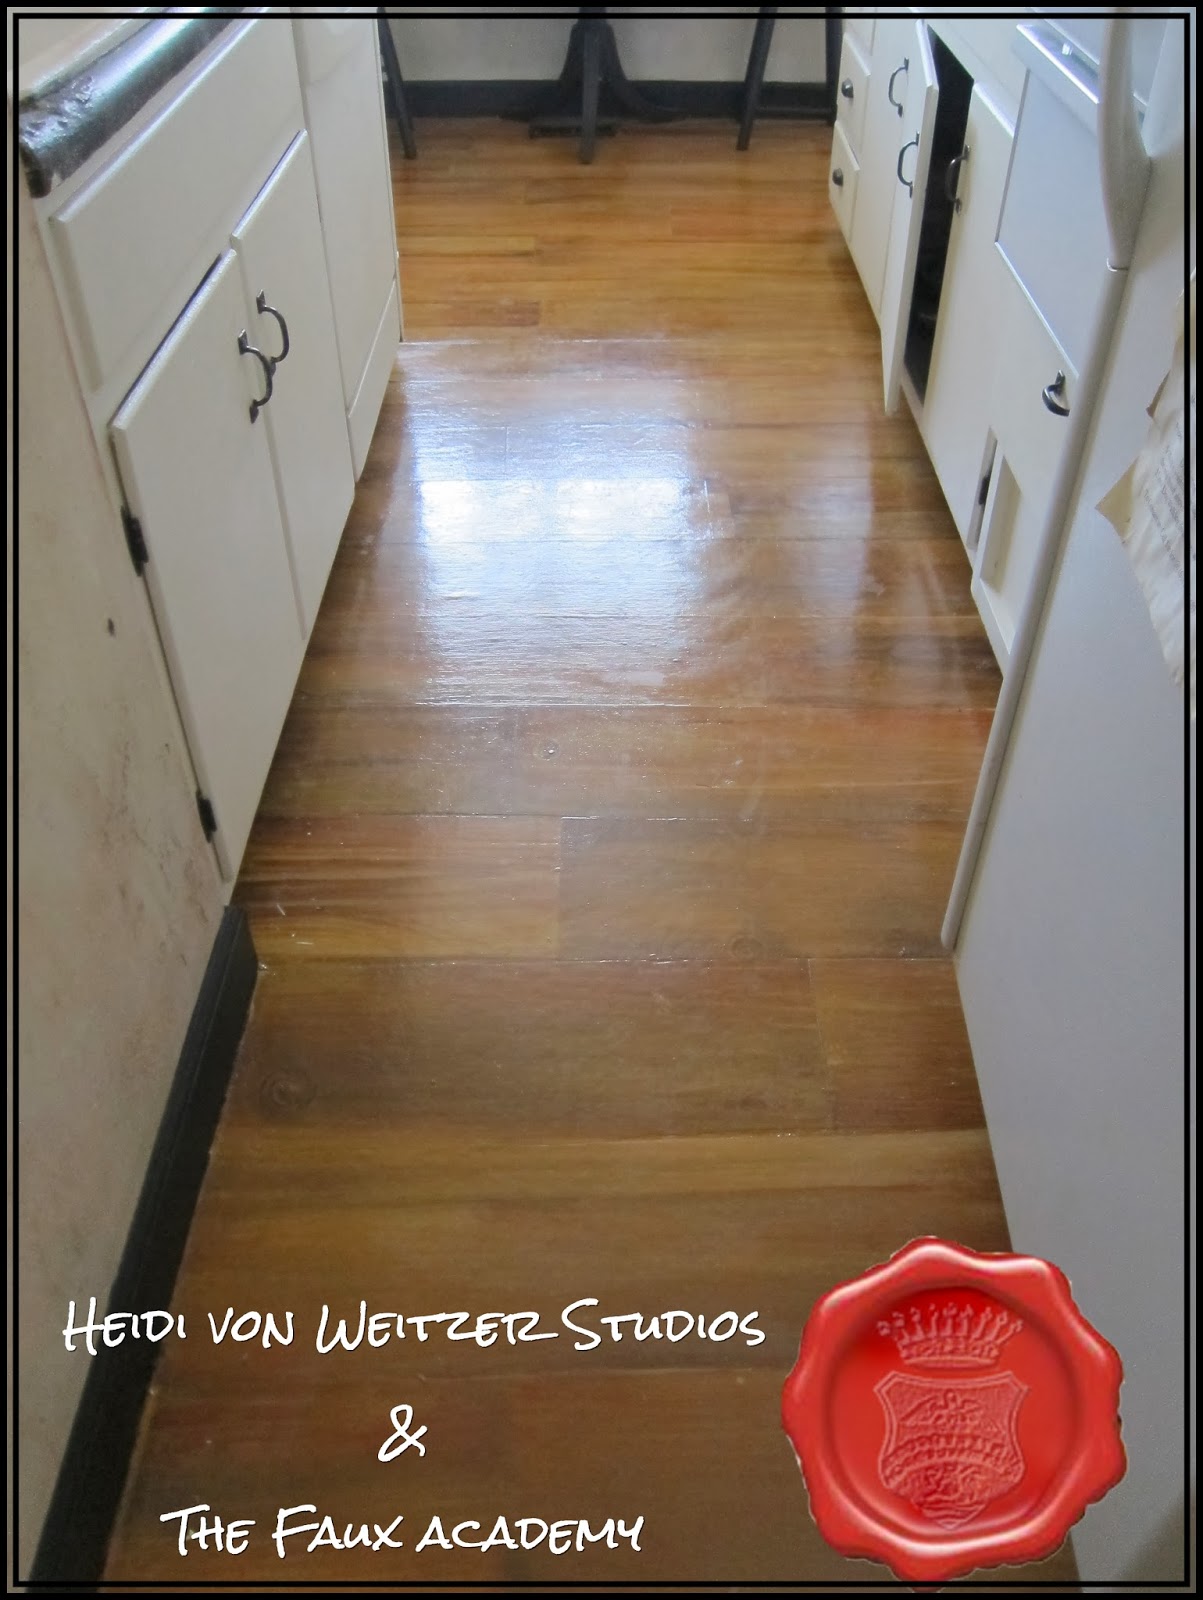
 
Approximately 15 years ago, I installed a paper floor. The existing floor was "tile look alike" linoleum. At the time, I did not know, if it would last. Well it did!! Although, I do have a very high traffic home, to say the least.

Recently, I decided that it was time, to give my paper floor some TLC.


Shiny and it looks like New


I fell in love with one of my client's antique, wide plank floors. The next morning a box truck arrived, including a carpenter. A few hours later, I had  an antique wide plank floor in my family room. I am in love with that floor. Many compliments after,  I decided that I wanted the same floor in my kitchen.At one time, I even climbed in the dumpster to get all the left over pieces, to see if I had enough wood to lay a kitchen floor. NO WAY!!! 

Well I am a designer and a faux finisher. Wood graining came to mind. However, I did not want to spend money removing  the linoleum  floor. I decided to use plain old, cheap construction paper.

Here is what I did  fifteen years ago!
Step One:

 Cut construction paper into strips.


Step Two:
 

Step Three:
Thin VOV (Vinyl over Vinyl) with water and  paste the strips onto the floor. Let dry.

Step Four 
Prime. Let dry. Apply two coats of yellow. I use BM Sunbeam

Now that all the necessary prep work is done, you are ready to "wood grain". Don't be afraid, you are going to simulate wood and it can be done very easily.

Colors used:

Although "wood graining" seems complicated, it's actually not. It's about color and pattern. Once you understand this, you can imitate almost any wood. To make it easy for you, we just simulate an antique floor, with some knot holes and grain.

Step One:

Mix your color glazes. I mix my graining glazes with water, because I work fast. With an acrylic medium you will have a longer "open time".

Step two:
Tape off the first plank. Brush on  the raw Sienna glaze. Wipe off your 4"chip brush. Brush through the wet glaze, until you created a wood-grain effect.Start at one end of the plank, and keep going in a continuous motion to the end of the plank.Continue stroke after stroke.


Keep wiping your brush. Let Dry. Care fully pick up some burnt Sienna glaze and create some additional values. Soften with a clean chip brush. Let dry. Add additional darks ( burnt Sienna and Black). Once you are satisfied with the grain, you may add some knotholes and or additional graining.


Now that my floor is completed, I decided to re-vamp my whole home. Is that OCD??? No, it's because of the long winter!!!

Take care and be safe sending blessings your way,

Fondly,


Friday, March 9, 2012

Aus neu macht alt

Wunderbar was man so mit Farbe machen kann. Ich bin in den Landhausstil verliebt und freue mich dass ich Euch einer meiner "Werke" vorstellen darf.

Hier habe ich ein Sideboard meiner Kundin auf alt hergerichtet. Das Sideboard hatte sie ganz billig erstanden und ich wurde beauftragt es zu  verschönern, gemäss dem mediterranen Stil in den sie verliebt ist.

 Die Inspiration waren der rote Taft-, und Jacquardstoffe  die ich ausgesucht hatte.


Eine billige Kommode wir ein Juwel!!!

Aus neu mach


Alt ... ein Juwel

Rostoptik

Rostoptik

Mitte " Reisslack mit Craquelleure und Trompe l'oeil" Seiten: Schablonentechnik


Schablonentechnik mit Bronze, 24ct. Gold usw.

 Ich beantworte gern alle Fragen. Bis dann, man sieht sich- passt auf Euch auf. Alles Liebe Eure  Heidi


Sunday, July 31, 2011

The painted House.......A Harlequin Patterned Powder Room


My clients love harlequin diamonds. Therefore,  I get a lot of requests to adorn walls with the ever popular design. The Harlequin design,  a repeating pattern of contrasting diamonds or elongated squares standing on end, has been around since  the fifteenth century. It is still a theme which is in high demand. This design can be found in antique fine furniture, marquetry, inlaid boxes, tables, dressers, and even floors.


The Italian-based classical character, the servant, wore colorful diamond-patterned tights and a mask.

Creating harlequin diamonds require lots of patience and measuring, but is well worth the intensive labor involved. If you want to save some time here is a harlequin calculator harlequin diamond calculator courtesy of Silverspoon Murals

Supplies:
Lots of 1"or 2" blue tape.
Soft fine pencil ( I use a mechanical pencil)
White Eraser ( art store or Michaels)
Chalk line 
Chalk in the color of the paint    or 
Pastel Pencils in the color of the paint
Two contrasting paint colors*  or if you like to create a monotone design use Eggshell sheen *

 Level ( if possible 5ft long) **
Ruler (if possible 5ft long)
Drop cloths
Paint roller
Angled paint brush ( for touch ups)
Razor ( for mitering corners)


* If you choose a monotone color theme you may use Eggshell sheen paint and MinWax satin polycrylic. 
** available at the wallpaper section in any paint store.
Step One:

Decide on the size of your diamonds. The rule of thumb is that the height of the diamond is twice the width. Now that you have figured out the the design or size, select a focal point. Usually the wall you see, entering the room. Completed this task you are now ready to tackle step two.

Step Two

Paint the room in the color of your choice.

Step Three:
Having calculated the height and width of
Courtesy of Silverspoon murals
 your diamond theme draw vertical lines onto the wall. The space between each line equals the width of your diamond. Continue around the room until each wall is done


Step Four:
Draw the horizontal lines onto the wall. These lines represent the height of your diamond theme. Continue around the room until each wall is done.

Step Five:
Once you have laid out your pattern you might have to make small adjustments in  each corner so the diamonds match up. You may make these small adjustments with the width only. 
Courtesy of Silverspoon Murals 
  
  Step Six: Find and mark the middle of each rectangle and mark the top, bottom,left and right side. Connect the points, using your ruler, chalk line, pencil or pastel pencil. Be aware that using a chalk line will deposit chalk residue on the wall.


Courtesy of Silverspoon Murals

 Step 7:
Having  your base color applied to all walls (step two) you now have to tape off each diamond. Mark each alternating diamond with a piece of tape, so you will not get confused which diamond to paint with the contrasting color. Use you single edge razor blade to miter the tape corners.


My client wanted a tufted harlequin pattern so I omitted contrasting paint colors, which gives you a subtle effect.


Try this classical design and let us know how you did. Good luck,


Thursday, April 28, 2011

Grüße aus Amerika

Hallo,
Sheraton Hotel  On Market Street
Herzliche Grüße aus St. Louis!!!


Ich lebe hier in St.Louis und arbeite als Malerin und Innenarchitektin. 


In Kürze werde ich einen speziell deutschen Blog für meine Leser herstellen. Bis dahin bitte ich um Geduld.. Ihr wisst ja.... was lange dauert, wird endlich gut.


Ich bitte Euch auch mir meinen amerikanischen Akzent zu vergeben. Ich lebe seit 34 Jahren hier in St. Louis und habe zwischenzeitlch mich mit dem Satz  "Deutsche Sprache, schwere Sprache " abgefunden.
Hollywood Reporter


Hier habe ich ein Wandgemälde für ein Spa angefertig. Man kann wunderbare Motive auf eine Leinwand malen und diese Leinwand  auf die Wand kleben. Ganz einfach. So könnt Ihr das Bild immer wieder abmachen. Schaut wie dieses Wand fertig aussieht. Auch meine Sassie (Hund) wurde mit eingemalt. Natürlich mit ihrem Cartier Halsband, es musste ja Glitz und Klimmer sein.


Projekt Sheraton Hotel in St. Louis. Diese Art von Malerei nennt man  Trompe L'oeil ( tromp leu) " ("das Auge betrügen") Wir haben den Begriff von den Franzsosen übernommen. Das Gemälde muß so echt aussehen, dass man an Wirklichkeit glaubt. Bei Euch sagt man auch " Illusionsmalerei". Erfolg heisst hier, den Betrachter zu täuschen.


So wird es gemacht.

  •   Motive mit einem Tintenstift  maßstabgerecht malen. Ich ziehe Tinte vor, da man eine qualitative gute Zeichnung anfertigen kann. 
  • Wenn Ihr nicht malen könnt, könnt Ihr auch ein Projektor nehmen, um das Bild auf die Wand zu projektieren.


  •  Das Motiv/Gemälde bei einer Druckerei  maßstabgerecht vergrößen lassen.


Copy....
1. ....mit einem Nährad durchlöchern. Ihr könnt auch eine Nähmaschine ohne  Faden benutzen.


2. ....auf die Leinwand legen und befestigen. Im Projekt "Sheraton haben ich es direkt auf die Wand befestigt.


3. ....mit Kohlenstaub heftig betupfen.


4.....abmachen.


5.....nun hast Du Dein Motiv auf der Leinwand.  .... jetzt wird gemalt.

Nächstes Mal lasse ich Euch alles über "Shabby Chic" wissen. 

Bis dahin alles Gute und eine gutes Wochende.


Heidi


Thursday, April 1, 2010

What's up with this blog??????

Not too much.... Obviously

It's taking a me huge amount of time teaching classes,  re-vamp a boring  and  not so user-friendly  website, promote  an awesome up-coming  Trompe l'oeil class, keep my designs up-dated, continue to educate myself, research new trends, and figure out what must be done next. In addition, carving out a few moments for a "Life" I don't  have. (Not able do this one as of yet)

I have a lot to say (many of you know) . As a typical ADD artist my brain harbors thousands of ideas but time is unwilling to let my creative juices flow freely. I am trying to change the craziness in my life, and be a better blogger, so you’ll love to visit and come back often. Listen closely. You’ll and learn some things from this “ADD" afflicted artist. 


Take care of yourself and be safe.

Let me know how I am doing? And a warm thank you for hanging with me.

Tuesday, January 12, 2010

A woman of my kind


"It appears as if we've come across this rouged monarch draped in his royal robes (Cremant du Roi) during a transcendent moment, carried away on the exquisite proboscis-tickling bubbles of Veuve Amiot sparkling wine. A convincing design of infinite charm that effortlessly persuades without sacrificing one jot of intimate amusement. In 1884, Elisa Amiot suddenly found herself a widow (veuve) with four children to raise. As she lived in the Sau
: Leonetto Cappiello Italian (1875-1942)

Courtesy: Of Yaneff.com

Heidi" thoughts....

This 9ft by 6ft canvass mural is a "Thank you" to Nikki my daughter- in-law who designed the header for the blog.The mural will be installed in such a fashion that it can be taken down for " keep sake " The layout is done and it looks pretty darn good. I am thinking that this would be a great piece of art in any wine cellar.For the wine and art connoisseurs among us please check out the Veuve Amiot website"Shine" and tell your client the history behind it. As a thank you present you could even give a bottle of this sparkling wine to your client.Your client will always remember you. "Remember the gal who gave us the champagne? We need her to do more work for us!"I hope that Nikki coughs one up also ( hint, hint) in addition I would like her to make my fave avocado salad which marvelous can be paired with that champagne, TRY IT - YOU LIKE IT!!!!
.
Supplies:
Buttery chunks of avocado, little bits of radish heat, and simple, lemony vinaigrette make his salad a crip and refreshing balm for wounded souls,

Mediums
  • 1/4 cup fresh lemon juice
     (Leftovers maybe used to Verdigris remember "recycle")
  •   1/2 cup olive oil
    (Leftovers maybe combined with raw umber tint which will give you an awesome wall finish)
  • 2 firm-ripe avocados 
    (Leftovers can be used for a really great nutritious face mask and I do not mean the salad).
  • 3 heads Bibb lettuce (3/4 pound total), leaves torn if large
  • 1 heart of romaine, sliced crosswise into 1-inch pieces
  • 3 medium radishes, thinly slice

Technique:


  • Whisk together lemon juice, 1/2 teaspoon salt, and 1/4 teaspoon pepper, then whisk in oil. Quarter, pit, and peel avocados, then cut into bite-size pieces. Toss with greens, radishes, and just enough dressing to coat. Season with salt and pepper. 


  • Tools:
    Champagne Flutes
    Hands
    Fork and knifes
    Kitchen knife
    Bowl
    Plates

    Bon Appetite!!!!


  •