“Florentine Plaster”

The incredible Florentine plaster is an easy, yet gorgeous faux finish technique. Still, after about twenty years, one of the best sellers. FP looks like a multi layer technique, but is not. Production is fast, easy and can not be compared to other textured techniques, due to inexpensive application. Contemporary, modern or electic, take your pick, Florentine Plaster will always be the "talk of the party"

“Croco”

An exquisite crocodile leather look alike faux finish. Designed and created for a famous baseball player. The king size bed, custom made to highlight this faux wall finish. Mediums used: Water Putty, Olive oil, gift-wrap etc.

“Grandeur”

(`granjər,`granˌdyo͝or/) noun: splendor and impressiveness, especially of appearance or style. The dictionary says it all. This grandiose faux finish was created with MM metallic plaster, gold powder and assorted MM metallics.

“There's No Crying in Baseball”

An extremely fast and effective wall glazing finish resembling a baseball. Created with paint only.

“Tuscany”

I found this beautiful faux finish in Florence, Italy in the Orsini Palace.

Welcome to My Home

Hello and Welcome!! My name is Heidi and one of my passion is faux painting. However, there are otherpasions and I live them daily. Take your pick. Interior design, decorating on the shabby side, gardening, herbs, fashion, culture and and last but not least "Style". In my world, the day should have 48 hours and more.

I am here to share some of my adventures with you, because I love to share and teach. I hope that you come by often and stay a while. Thank you for sharing your time with me.
Showing posts with label Thrifty decorating. Show all posts

Thursday, March 6, 2014

A Paper Floor - Inexpensive and it lasts and lasts!!!

Hello from St. Louis,
Yes, a paper floor lasts and lasts!!!!
 
Approximately 15 years ago, I installed a paper floor. The existing floor was "tile look alike" linoleum. At the time, I did not know, if it would last. Well it did!! Although, I do have a very high traffic home, to say the least.

Recently, I decided that it was time, to give my paper floor some TLC.


Shiny and it looks like New


I fell in love with one of my client's antique, wide plank floors. The next morning a box truck arrived, including a carpenter. A few hours later, I had  an antique wide plank floor in my family room. I am in love with that floor. Many compliments after,  I decided that I wanted the same floor in my kitchen.At one time, I even climbed in the dumpster to get all the left over pieces, to see if I had enough wood to lay a kitchen floor. NO WAY!!! 

Well I am a designer and a faux finisher. Wood graining came to mind. However, I did not want to spend money removing  the linoleum  floor. I decided to use plain old, cheap construction paper.

Here is what I did  fifteen years ago!
Step One:

 Cut construction paper into strips.


Step Two:
 

Step Three:
Thin VOV (Vinyl over Vinyl) with water and  paste the strips onto the floor. Let dry.

Step Four 
Prime. Let dry. Apply two coats of yellow. I use BM Sunbeam

Now that all the necessary prep work is done, you are ready to "wood grain". Don't be afraid, you are going to simulate wood and it can be done very easily.

Colors used:

Although "wood graining" seems complicated, it's actually not. It's about color and pattern. Once you understand this, you can imitate almost any wood. To make it easy for you, we just simulate an antique floor, with some knot holes and grain.

Step One:

Mix your color glazes. I mix my graining glazes with water, because I work fast. With an acrylic medium you will have a longer "open time".

Step two:
Tape off the first plank. Brush on  the raw Sienna glaze. Wipe off your 4"chip brush. Brush through the wet glaze, until you created a wood-grain effect.Start at one end of the plank, and keep going in a continuous motion to the end of the plank.Continue stroke after stroke.


Keep wiping your brush. Let Dry. Care fully pick up some burnt Sienna glaze and create some additional values. Soften with a clean chip brush. Let dry. Add additional darks ( burnt Sienna and Black). Once you are satisfied with the grain, you may add some knotholes and or additional graining.


Now that my floor is completed, I decided to re-vamp my whole home. Is that OCD??? No, it's because of the long winter!!!

Take care and be safe sending blessings your way,

Fondly,


Saturday, March 24, 2012

Ostergrüsse aus den USA

Hallo meine Lieben,


Hatte heute ein bisschen Zeit auf der Internet herum zu surfen. Ich dachte mir, dass es vielleicht für Euch interessant wäre zu sehen wie kreativ die  "Amis" sind. :)


Courtesy of http://todolwen.blogspot.com

Courtesy of http://todolwen.blogspot.com

Courtesy of http://todolwen.blogspot.com
Ich habe  die folgende tolle Anleitung für eine Papierfeder bei Karen Bailey  gefunden. Kurz und gut... ich habe mich in diese Federn verliebt. Ich bin froh, dass ich sie noch vor Ostern gefunden habe, und hoffe,  dass diese Federn auch Euch gefallen. Viel Spass beim kreativen werkeln.

So geht's


Werkzeug

Osterfeder  (Notenblätter,Lexikonblätter oder alte Bücher)
- Schere
- Weissen Leim
- Cutter ( Drahtschneider)
- Draht (  ca 45cm lang)
- Festes Papier ( 240 - 260 g)
- Bleistift

Courtesy of http://todolwen.blogspot.com
Lade hier die Schablone herunter.
Courtesy of http://todolwen.blogspot.com

Der Draht (ca 35 cm/20cm) wir so gebogen, dass ein Ende ungefähr 3 cm länger ist.


Courtesy of http://todolwen.blogspot.com

Der Draht wird auf das ausgesuchte Papier geklebt. Nicht vergessen 3 cm unterhalb des Papiers den Draht hervor schauen lassen.

Courtesy of http://todolwen.blogspot.com


Jetzt wir ein zweites Blatt aufgeklebt. Trocknen lassen.


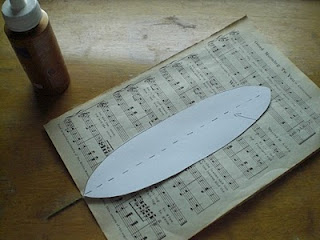
 Die Kartonageschablone wird  genau auf das Papier gelegt.


Courtesy of http://todolwen.blogspot.com

und die Umrisse der Schablone werden mit Bleistift übertragen.


Courtesy of http://todolwen.blogspot.com

Courtesy of http://todolwen.blogspot.com
Jetzt werden  die Schablonen zu Federn zugeschnitten, und voilà   

Die Federn sind Fertig!!!!


Viele liebe Grüße aus den USA


Eure 


Thursday, September 8, 2011

A new Face for your Bookshelf

Yesterday I started to re-do book shelves for one of my clients. Here are the step by step instructions to follow along, transforming  your book shelves and any  other wood work.


Supplies:
Latex eggshell paint
Water
Chip Brushes
Rags
Cardboard

Glaze consistency: Mix one quart of paint with one cup of water.


Colors: On a fan deck choose 2 colors of the same color range. Select 2 colors, medium and dark. I use the third; and fifth hue. For the highlight color mix the fifth color with white.


Aging glaze: I usually use a dark brown or dark grey depending what look I want to achieve. However, you may also use the last color on the fan deck.

Dry Brushing:
Submerge paint brush into paint. On a piece of cardboard work the paint into the brush. Do not work with a fully loaded brush. Remember " Dry Brushing".


When you are glazing make sure to retain some of the previous coat. You want to achieve an orderly distressed look with all  colors visible.

Step One:
Dismantle the bookshelves.


Step two:
Sand thoroughly and dust.


Step 4
Apply a very dark glaze ( I used a black green glaze). Let dry.


Step 5
Apply dark green glaze. Let dry.
Step 5 and 6

Step 6
Apply a medium green glaze. Let dry.

Step 7
Apply highlights with the lightest glaze. Let Dry.


Happy painting until next time 


Monday, August 8, 2011

It's all about color - How to create your color scheme like a professional

Working as a faux finisher and decorative artist,  I have learned that  some of us are afraid of color, although color is the most important aspect of interior design. Choosing the right colors doesn't have to be difficult. Here are some simple  rules you can apply and hopefully you will be able to step out of the color la, la land.


My last blog  tried to get you started in the  color selecting process. Now I am trying to explain the next steps, so you will be able to make the right color decisions. After all, our homes are full of color and we want to feel comfortable in our homes.

Beside warm and cool colors we differentiate in tone in tone(monochromatic), analogous, complimentary and split complimentary color schemes. To make thing less confusing, I only will discuss the main and most important (IMO) schemes. 


Monochromatic: Use tints, shades and and tones of the key color. Tone in tone or monochromatic is balanced, quiet and visually pleasing. No high energy level in this  color scheme.
Monochromatic, tone in tone using shades, tints and tones of the key color


All Images of Paula Grace Designs
 If the quiet simplicity and soothing effect  of the tone in tone color scheme is letting you fall asleep during day, step it up a notch to the analogous color scheme.


Analogous:
The analogous color scheme uses colors which are adjacent to each other 


Analogous cool design

Analogous warm design

Analogous warm design
The analogous color scheme uses one dominant color with punches of sumptuous richness. This scheme is not as vibrant as the complimentary one and one must be careful not to overdo it with lots of hues of too many colors. This color scheme looks much richer then the monochromatic one.


I hope that these tips on color design  selections  make your life a bit easier. Stay tune, more to come soon.


All my Best,


Friday, August 5, 2011

Inspiration... or the lack thereof

Sometimes creative right side brain souls suffer from lack of inspiration.
 We all know that inspiration is an important part of the creative process.Recently, that's  exactly what was happening to me. The more I tried to create, the more I was stuck. Utterly helpless, I decided to do something about it. I registered for the yearly Decorative Art convention in Hampton Virginia. If nothing else, I knew I would be inspired just being  in an environment with like minded artists.


 As the owner of the Faux Academy and a decorative artist, I eventually decided to take a class. Being a student was totally new to me, but I had so much fun. .  I am here to tell you  that it worked. I am inspired again, happy to go back t my studio and starting to create new designs and finishes. My brain is full of ideas.  A warm thank you to all decorative artists who shared, conversed, told jokes and hugged.

Creative types know that inspiration is an important part of our being. If this should strike, there some things you can do.

1. Create a reference file. Every time you get stuck flip through this file and possibly the creative juices are beginning to flow.

2.Hang out with other creative types, talk, share ideas,  learn and listen. from them

3. Allow yourself to be stuck and create anyway.

4. Allow yourself to create "bad" samples and finishes, eventually you will come up with something you like.


Best of Luck


Saturday, July 9, 2011

It's time.... give that old dresser a make over

Recently I decided to make over an old library table which  collected dust in my basement and which was bought for a make over. But.. alas... the mind is willing but the hands are not. So, finally I decided to tackle that project.  Maybe you have some old furniture piece, which is in desperate need to get some TLC.  


Here are some ideas which might inspire you.


Library Table - Before
I chose a design depicting a McKenzie Childs rendition, because I always wanted to have some piece out of her collection.
Library Table - After


A client of mine bought this sideboard at a rummage sale.  She ran out of ideas what to do with that piece and hired me  for a make over.


I decided to base coat the piece red, with a faux painted  rust table top and a rust finish on the doors. I painted a trompe l'oeil rendition on the doors and stenciled the side panels. Once finished the trompe l'oeil design was crackled followed by waxing, which made this chest look a hundred years old.


This old writing desk received a glam 1920s look by covering the drawers with black silk fabric. I love this idea. Just imagine the hundreds of possibilities. People are so smart to come up with these ideas. Looks like it's easy to do but the end result is very glamorous.


Courtesy of My Crazy Life 

 I love the fabric on the drawers and see this piece in any room


Courtesy of My Crazy Life 


I absolutely love  this made over Bombay chest.


Curbly Chic
This make over involved  silver leave. Isn't it astounding how elegant it turned out?


Moral of the story, don't be afraid to tackle a make over. And if you do, please share. We all want to know and see.


Until next time....

Blessings,