“Florentine Plaster”

The incredible Florentine plaster is an easy, yet gorgeous faux finish technique. Still, after about twenty years, one of the best sellers. FP looks like a multi layer technique, but is not. Production is fast, easy and can not be compared to other textured techniques, due to inexpensive application. Contemporary, modern or electic, take your pick, Florentine Plaster will always be the "talk of the party"

“Croco”

An exquisite crocodile leather look alike faux finish. Designed and created for a famous baseball player. The king size bed, custom made to highlight this faux wall finish. Mediums used: Water Putty, Olive oil, gift-wrap etc.

“Grandeur”

(`granjər,`granˌdyo͝or/) noun: splendor and impressiveness, especially of appearance or style. The dictionary says it all. This grandiose faux finish was created with MM metallic plaster, gold powder and assorted MM metallics.

“There's No Crying in Baseball”

An extremely fast and effective wall glazing finish resembling a baseball. Created with paint only.

“Tuscany”

I found this beautiful faux finish in Florence, Italy in the Orsini Palace.

Welcome to My Home

Hello and Welcome!! My name is Heidi and one of my passion is faux painting. However, there are otherpasions and I live them daily. Take your pick. Interior design, decorating on the shabby side, gardening, herbs, fashion, culture and and last but not least "Style". In my world, the day should have 48 hours and more.

I am here to share some of my adventures with you, because I love to share and teach. I hope that you come by often and stay a while. Thank you for sharing your time with me.
Showing posts with label Decorating on the cheap. Show all posts

Thursday, March 6, 2014

A Paper Floor - Inexpensive and it lasts and lasts!!!

Hello from St. Louis,
Yes, a paper floor lasts and lasts!!!!
 
Approximately 15 years ago, I installed a paper floor. The existing floor was "tile look alike" linoleum. At the time, I did not know, if it would last. Well it did!! Although, I do have a very high traffic home, to say the least.

Recently, I decided that it was time, to give my paper floor some TLC.


Shiny and it looks like New


I fell in love with one of my client's antique, wide plank floors. The next morning a box truck arrived, including a carpenter. A few hours later, I had  an antique wide plank floor in my family room. I am in love with that floor. Many compliments after,  I decided that I wanted the same floor in my kitchen.At one time, I even climbed in the dumpster to get all the left over pieces, to see if I had enough wood to lay a kitchen floor. NO WAY!!! 

Well I am a designer and a faux finisher. Wood graining came to mind. However, I did not want to spend money removing  the linoleum  floor. I decided to use plain old, cheap construction paper.

Here is what I did  fifteen years ago!
Step One:

 Cut construction paper into strips.


Step Two:
 

Step Three:
Thin VOV (Vinyl over Vinyl) with water and  paste the strips onto the floor. Let dry.

Step Four 
Prime. Let dry. Apply two coats of yellow. I use BM Sunbeam

Now that all the necessary prep work is done, you are ready to "wood grain". Don't be afraid, you are going to simulate wood and it can be done very easily.

Colors used:

Although "wood graining" seems complicated, it's actually not. It's about color and pattern. Once you understand this, you can imitate almost any wood. To make it easy for you, we just simulate an antique floor, with some knot holes and grain.

Step One:

Mix your color glazes. I mix my graining glazes with water, because I work fast. With an acrylic medium you will have a longer "open time".

Step two:
Tape off the first plank. Brush on  the raw Sienna glaze. Wipe off your 4"chip brush. Brush through the wet glaze, until you created a wood-grain effect.Start at one end of the plank, and keep going in a continuous motion to the end of the plank.Continue stroke after stroke.


Keep wiping your brush. Let Dry. Care fully pick up some burnt Sienna glaze and create some additional values. Soften with a clean chip brush. Let dry. Add additional darks ( burnt Sienna and Black). Once you are satisfied with the grain, you may add some knotholes and or additional graining.


Now that my floor is completed, I decided to re-vamp my whole home. Is that OCD??? No, it's because of the long winter!!!

Take care and be safe sending blessings your way,

Fondly,


Saturday, March 24, 2012

Ostergrüsse aus den USA

Hallo meine Lieben,


Hatte heute ein bisschen Zeit auf der Internet herum zu surfen. Ich dachte mir, dass es vielleicht für Euch interessant wäre zu sehen wie kreativ die  "Amis" sind. :)


Courtesy of http://todolwen.blogspot.com

Courtesy of http://todolwen.blogspot.com

Courtesy of http://todolwen.blogspot.com
Ich habe  die folgende tolle Anleitung für eine Papierfeder bei Karen Bailey  gefunden. Kurz und gut... ich habe mich in diese Federn verliebt. Ich bin froh, dass ich sie noch vor Ostern gefunden habe, und hoffe,  dass diese Federn auch Euch gefallen. Viel Spass beim kreativen werkeln.

So geht's


Werkzeug

Osterfeder  (Notenblätter,Lexikonblätter oder alte Bücher)
- Schere
- Weissen Leim
- Cutter ( Drahtschneider)
- Draht (  ca 45cm lang)
- Festes Papier ( 240 - 260 g)
- Bleistift

Courtesy of http://todolwen.blogspot.com
Lade hier die Schablone herunter.
Courtesy of http://todolwen.blogspot.com

Der Draht (ca 35 cm/20cm) wir so gebogen, dass ein Ende ungefähr 3 cm länger ist.


Courtesy of http://todolwen.blogspot.com

Der Draht wird auf das ausgesuchte Papier geklebt. Nicht vergessen 3 cm unterhalb des Papiers den Draht hervor schauen lassen.

Courtesy of http://todolwen.blogspot.com


Jetzt wir ein zweites Blatt aufgeklebt. Trocknen lassen.


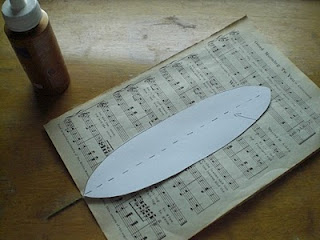
 Die Kartonageschablone wird  genau auf das Papier gelegt.


Courtesy of http://todolwen.blogspot.com

und die Umrisse der Schablone werden mit Bleistift übertragen.


Courtesy of http://todolwen.blogspot.com

Courtesy of http://todolwen.blogspot.com
Jetzt werden  die Schablonen zu Federn zugeschnitten, und voilà   

Die Federn sind Fertig!!!!


Viele liebe Grüße aus den USA


Eure 


Friday, July 23, 2010

Budget Face Lift For Your Kitchen Cabinets....

Yesterday, I explained the proper preparation for an unique kitchen face lift on a budget.

Today, I will let you know how to proceed to get a really cool French Country look ( you may call it anything you would like). The hot trend of the last few years is to get rid of dated oak cabinets and design your cabinets to be more like furniture. With a fast and simple glaze you are able to achieve that $60.000 look for $ 60.00.


Freshly painted Cabinet Doors


 Supplies Needed


                                4" double Chip Brush ( Home Depot)

    MinWax natural floor  wax

                                Artist oil color ( Raw umber, yellow oxide                                             and burnt umber)
                     You may substitute with Universal Tint
           
Rags


I like to use wax, because it is easy to manipulate, doesn't dry very fast, and it has a long shelve life.


Three Steps and VOILÂ -  A French Kitchen

Mix the wax with the artist oil colors or the tint to a warm brown.
    Dip your chip brush lightly into the Mineral Spirits and then into the wax and spread the mixture onto the surface. Soften and even out. Let cure for a few minutes ( you could do 5 additional doors)

    Dip your rag light in  Mineral Spirits and take off some glaze.

      I prefer to leave most of glaze in the crevices.

      Happy Painting!!


      Behr Paint and Primer in One - does it really work?

      Yesterday,  I explained how to paint/prep kitchen cabinets for application of a French  Country look glaze. My passion, playing with paint, got hold of me,  feeling compelled to try a new product."Behr Premium Plus, Paint and Primer In One". Maybe you have seen the TV commercials. 

      I was quite disappointed applying the coating. It just didn't work  the way I am used to. I did not prime the surfaces, simply because the primer is supposed to be in the paint. Maybe it is or maybe it is not. All I know it seemed to peel off very easily. even after the 2nd coat. I followed  the instructions to a "T". For my next project I am going back to my favorite primer Zinsser, Bulls Eye 1.2.3..
      1.2.3 followed by 2 top coats - and it sticks!!. The moral of this post: Sometimes it is best to leave things the way they are.!!

      This is why I like 1.2.3. Primer. It never has failed me. No sanding necessary so it's a time saver. It even works on mirrors and other glossy surfaces.  It's just a great product, and I guess you get what you pay for.

      Happy Painting!!